- Published on
Cotoneaster Hedge: The Ultimate Guide to Planting & Care

- Authors
- Name
- Plant And Garden Secrets


The Cotoneaster hedge is a gardener's practical choice for a multitude of reasons. Hailing from regions across Asia, Europe, and North Africa, this versatile plant has found its way into gardens worldwide. Whether you're looking to establish clear boundaries in your yard or seeking a low-maintenance shrub that's both functional and visually pleasing, Cotoneaster checks all the boxes. With its dense branches, hardy nature, and the added bonus of bright berries in the fall, this hedge offers year-round benefits. This guide delves deep into the Cotoneaster hedge, providing insights and tips on how to make the most of this dependable garden staple.
- Benefits of Using Cotoneaster as a Hedge
- Understanding Proper Cotoneaster Hedge Plant Spacing
- Step-by-Step Guide to Transplanting a Cotoneaster Hedge
- The Appeal of Cotoneaster Hedge Berries
- Common Cotoneaster Hedge Diseases
- Cotoneaster Hedge Blight: Identification and Management
- Choosing the Right Type of Cotoneaster for Your Hedge
- Pruning and Shaping Your Cotoneaster Hedge
- Watering and Fertilization: Essential Care Tips
- Managing Pests: Common Threats to Cotoneaster Hedges
- The Role of Soil in Cotoneaster Health
- Propagating Cotoneaster: Growing Your Hedge from Cuttings
Benefits of Using Cotoneaster as a Hedge
Cotoneaster hedges are a popular choice among gardeners and landscapers, and their widespread use isn't merely a coincidence. Let's dive into the key advantages that make Cotoneaster stand out in the world of hedges:
Low Maintenance: One of the primary reasons gardeners gravitate towards the Cotoneaster hedge is its low-maintenance nature. It can thrive in a variety of soil types and requires minimal care once established.
Versatility: Cotoneaster hedges are adaptable. They fit well in both large landscapes and smaller garden spaces. Whether you're looking to create a boundary, a visual barrier, or simply a decorative element, these hedges are up to the task.
Year-Round Visual Appeal: While many hedges are season-dependent when it comes to their visual charm, Cotoneaster offers beauty throughout the year. Its dense green leaves are a constant, and the vibrant berries that emerge in the fall add a splash of color to any garden.
Wildlife Attraction: Beyond just aesthetics, the Cotoneaster hedge is a boon for nature enthusiasts. The berries attract a variety of birds, turning your garden into a mini sanctuary.
Disease Resistance: While not immune, Cotoneasters do exhibit a good degree of resistance to many common plant diseases. This resilience further underscores its appeal as a low-maintenance choice.
Soil Erosion Control: Thanks to its extensive root system, Cotoneaster hedges can be used effectively to prevent soil erosion, especially in sloped areas.
Air Purification: Like many plants, Cotoneaster helps in purifying the air. It absorbs carbon dioxide and releases oxygen, making your garden not only beautiful but also environmentally beneficial.
In summary, the Cotoneaster hedge is more than just a plant; it's a multifunctional addition to any garden. It seamlessly blends aesthetics with functionality, offering both visual charm and tangible benefits. As we progress through this guide, you'll gain deeper insights into making the most of this versatile hedge in your landscape.
Understanding Proper Cotoneaster Hedge Plant Spacing
Achieving the perfect hedge isn't just about picking the right plant; it also hinges on understanding the intricacies of how they grow. One of the most crucial aspects to consider when planting a Cotoneaster hedge is the spacing between each plant. Proper spacing ensures healthy growth, adequate sunlight, and efficient nutrient absorption for each plant. Let's delve into the details:
Why Spacing Matters:
- Adequate Root Growth: Proper spacing gives the roots enough room to expand. This is essential for the plant to anchor itself into the ground and absorb nutrients effectively.
- Air Circulation: Good spacing prevents the accumulation of moisture, reducing the risk of diseases like Cotoneaster Hedge Blight.
- Uniform Growth: Evenly spaced plants receive consistent sunlight, leading to a more uniform and visually appealing hedge.
Determining the Right Spacing:
- Hedge Purpose: If you're looking for a dense, privacy hedge, you'll plant Cotoneaster closer together. For decorative purposes, where individual plants' shapes matter more, a bit more distance would be apt.
- Plant Size: Different Cotoneaster varieties have different mature sizes. Smaller varieties like the Cotoneaster horizontalis might be spaced closer, while larger types need more space.
General Spacing Guidelines:
- For Dense Hedges: Plant Cotoneaster shrubs about 3-4 feet apart.
- For Loose Hedges: If you're not looking for a tight barrier, consider spacing them 5-6 feet apart.
- Individual Plant Display: For showcasing individual plants, a spacing of 7 feet or more is ideal.
Consider Growth Rate: Cotoneasters are relatively fast growers. While initially, they might seem sparse, remember they will fill in quickly. Factor in the growth rate when determining spacing.
Adjusting with Time: It's always a good idea to periodically check the growth of your Cotoneaster hedge. If you notice overcrowding or uneven growth, consider transplanting to adjust the spacing, following our guide on transplanting a Cotoneaster hedge.
In conclusion, understanding the proper spacing for your Cotoneaster hedge is pivotal for its long-term health and aesthetics. As with many gardening endeavors, it requires a blend of research, observation, and adjustment to get things just right. By adhering to these guidelines and regularly monitoring your hedge, you'll ensure that your Cotoneaster thrives and continues to beautify your landscape.
Step-by-Step Guide to Transplanting a Cotoneaster Hedge
Transplanting a Cotoneaster hedge, like any other gardening endeavor, requires careful planning and execution. The process can seem daunting, especially if you're aiming to preserve the health and appearance of the plant during the move. However, with a systematic approach and attention to detail, the task becomes manageable and rewarding. Here's a step-by-step guide to help you navigate the process:
Choose the Right Time:
- It's generally best to transplant Cotoneaster during its dormant period, which is typically in late winter or early spring. This ensures the plant undergoes minimal stress during the move.
Preparation of the New Site:
- Soil: Check the soil quality, ensuring it has good drainage, as mentioned in our section on The Role of Soil in Cotoneaster Health.
- Location: Choose a location with ample sunlight, though Cotoneasters can also tolerate partial shade.
- Digging: Prepare a hole at least twice the size of the root ball of the hedge to be transplanted.
Water Before Moving:
- Moisten the soil around the Cotoneaster a day before the transplant. This ensures the root ball remains intact during the move.
Uproot with Care:
- Using a sharp spade, start digging a trench around the plant, approximately 12-18 inches away from the base. Dig deep enough to get under the root system, and then gently lift the plant from the ground.
Inspect and Prune Roots:
- Check the root system for any damaged or diseased roots and prune them. This not only makes the transplanting process easier but also ensures a healthier regrowth.
Place in the New Location:
- Position the Cotoneaster in the center of the previously prepared hole. Ensure that it's at the same depth as it was in its original location. Fill the hole with soil, patting it down gently to remove air pockets.
Water Generously:
- After transplanting, water the plant thoroughly. This helps the soil settle and provides the necessary hydration for the Cotoneaster to recover from transplant shock.
Monitor and Care:
- In the weeks following the transplant, keep an eye on the Cotoneaster's health. Ensure it's receiving adequate water, and protect it from extreme conditions, like frost or excessive sunlight.
- Consider adding a layer of mulch around the base to retain moisture and regulate soil temperature.
Adjustments and Interventions:
- If you notice signs of distress, like wilting or yellowing leaves, consider interventions such as adjusting water levels or temporarily providing shade.
In essence, transplanting a Cotoneaster hedge is about balancing precision with care. By following this systematic approach and referencing related sections in this guide, you're setting the stage for your Cotoneaster to thrive in its new home and continue being a focal point in your landscape.
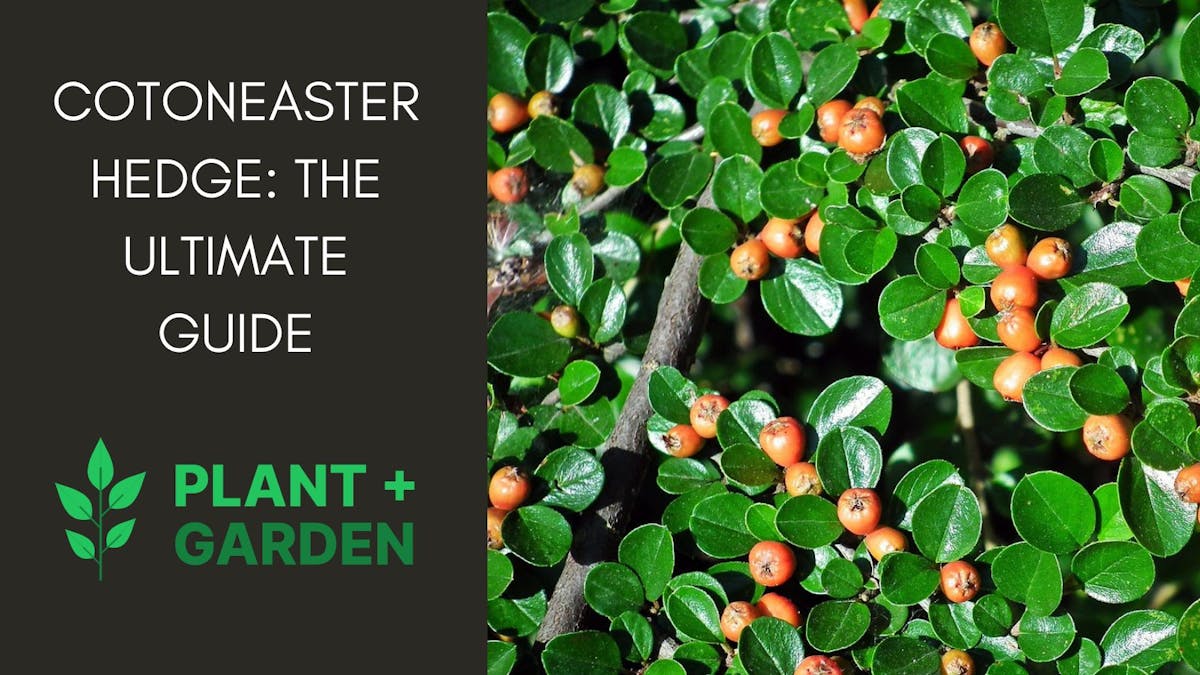
The Appeal of Cotoneaster Hedge Berries
The Cotoneaster hedge, with its vibrant green foliage, is already an attractive addition to any garden. Yet, one of its standout features is the bright, beautiful berries that adorn its branches, especially during the fall. These berries not only add a pop of color but also provide an array of benefits. Let's explore the multifaceted appeal of Cotoneaster hedge berries:
Aesthetic Value:
- Seasonal Transformation: The berries bring a new dimension to the Cotoneaster's appearance. Their vivid red or orange hues contrast beautifully with the green leaves, making the hedge a focal point during the colder months.
- Winter Wonderland: Even when the leaves drop, the berries often persist, adding charm to winter landscapes.
Wildlife Magnet:
- Birds: As discussed in our section on Benefits of Using Cotoneaster as a Hedge, these berries attract a variety of birds. From thrushes to blackbirds, the berries provide them with a vital food source during winter.
- Beneficial Insects: Some species of beneficial insects are also drawn to the berries, enhancing biodiversity in your garden.
Medicinal and Cultural Importance:
- While most species of Cotoneaster berries are not edible for humans, in some cultures, specific species have been used for medicinal purposes.
- Historically, certain types of Cotoneaster berries have been incorporated into traditional remedies, though one should always consult with a professional before considering such uses.
Gardening Flexibility:
- Variety Selection: Different Cotoneaster species produce berries of varying sizes, colors, and abundance. By understanding the characteristics of each type, as covered in Choosing the Right Type of Cotoneaster for Your Hedge, gardeners can select the variety that aligns best with their aesthetic preferences.
- Landscaping Options: Berries add texture and color, allowing for diverse landscaping designs. They can be used as background hedges, centerpiece attractions, or even in mixed border designs.
Considerations and Care:
- Toxicity: It's essential to note that while birds can consume Cotoneaster berries without harm, they can be toxic to humans and pets when ingested. Always exercise caution and ensure that children and pets don't eat them.
- Maintenance: While the Cotoneaster is relatively low maintenance, ensuring proper care, as outlined in our sections on Plant Spacing and Transplanting, will guarantee a healthy plant that produces vibrant and abundant berries.
In conclusion, the berries of the Cotoneaster hedge elevate its appeal, making it a versatile and attractive choice for gardens of all sizes. By understanding their benefits, beauty, and the care they require, you can maximize the aesthetic and functional advantages they bring to your outdoor space.
Common Cotoneaster Hedge Diseases
While Cotoneaster hedges are a popular choice for their hardiness and ornamental value, like any plant, they can fall victim to various diseases. Being aware of these diseases, their symptoms, and the preventive measures can ensure the longevity and health of your hedge. Here, we’ll dive into some common diseases affecting Cotoneaster hedges and ways to manage them:
Fire Blight:
- Symptoms: This bacterial disease causes wilting and blackening of branches, resembling fire damage. Leaves and branches can appear scorched, and there might be a visible oozing of a sticky substance.
- Management: Prune the infected areas well below the visible symptoms, ensuring tools are sterilized between cuts. Avoid excessive nitrogen fertilization, which can exacerbate the problem. For severe cases, consult a local nursery about appropriate bactericides.
Cotoneaster Leaf Spot:
- Symptoms: As the name suggests, this fungal disease leads to the appearance of brown or black spots on the leaves, eventually causing defoliation.
- Management: Improve air circulation by correctly spacing plants, as discussed in Understanding Proper Cotoneaster Hedge Plant Spacing. Prune and dispose of affected leaves. Fungicidal sprays can also be beneficial.
Cotoneaster Web Blight:
- Symptoms: This is a fungal disease that manifests as white, web-like growth on the lower branches, especially in humid conditions.
- Management: Regularly inspect the hedge, especially during humid months. Improve air circulation, and consider fungicide applications if the disease is prevalent.
Powdery Mildew:
- Symptoms: White, powdery substance on leaves and stems, which can cause leaf curling and early leaf drop.
- Management: Ensuring proper spacing and pruning can improve air circulation, reducing the likelihood of this disease. Fungicides can be used for severe cases.
Root Rot:
- Symptoms: Yellowing and wilting of leaves, stunted growth, and blackening of the roots. This is commonly caused due to overly wet soils.
- Management: Ensure proper drainage in the soil. If you notice symptoms, consider transplanting the hedge to a better-draining location, as guided in our section on Transplanting a Cotoneaster Hedge.
Prevention is Key:
- Regular Inspections: Periodically inspect your Cotoneaster hedge for any signs of diseases. Early detection often allows for more effective management.
- Hygiene: Ensure that fallen leaves, especially infected ones, are regularly removed from around the hedge. This prevents the spread of fungal spores.
- Optimal Conditions: Providing the Cotoneaster with its ideal growing conditions – proper sunlight, spacing, and drainage – can bolster its defenses against diseases.
In conclusion, while diseases can pose challenges to the health of your Cotoneaster hedge, being informed and proactive can make a significant difference. Armed with this knowledge, you can ensure that your hedge remains a vibrant and resilient feature in your garden.
Cotoneaster Hedge Blight: Identification and Management
Blight is a term commonly used to describe a set of symptoms indicating disease in plants, often leading to their rapid and severe deterioration. Cotoneaster hedges, while known for their hardiness, are not immune to blight, particularly a type known as Fire Blight. Understanding how to identify and manage this condition is paramount to maintaining a healthy hedge. Here's what you need to know:
Identification of Cotoneaster Hedge Blight (Fire Blight):
- Initial Symptoms: The disease often manifests as a watery, light tan bacterial ooze on branches, flowers, or fruits.
- Branches and Twigs: They begin to darken and curl, taking on a "shepherd’s crook" appearance.
- Leaves: Affected leaves turn dark and wither but typically remain on the tree. This gives the plant a burnt or scorched appearance, hence the name "Fire Blight."
- Flowers: Infected flowers will appear water-soaked initially, then turn brown or black and shrivel.
Causes and Conditions Favoring Blight:
- Bacterial Origin: Fire Blight is caused by the bacterium Erwinia amylovora. This bacterium thrives in warm, humid, and wet conditions.
- Transmission: The disease can be spread by rain or water splash, infected pruning tools, and sometimes by insects moving between flowers.
Management and Control:
- Pruning: One of the most effective methods to manage Fire Blight is by removing affected branches. Ensure that you prune at least 12 inches below the blight’s visible symptoms and sterilize tools between cuts.
- Resistant Varieties: If you're at the planning stage or considering a replacement, refer to our section on Choosing the Right Type of Cotoneaster for Your Hedge. Opt for varieties known to have some resistance to Fire Blight.
- Avoid Excessive Fertilization: High nitrogen levels can encourage the rapid growth of shoots, which are more susceptible to the disease.
- Bactericides: Consult with a local nursery or agricultural extension about the use of appropriate bactericides for Fire Blight. Remember to follow label directions carefully.
Preventive Measures:
- Watering Practices: Avoid overhead watering. Water at the base to prevent splashing, which can spread the bacterium.
- Hygiene: Regularly clear away dead or fallen foliage, especially if it shows signs of disease.
- Regular Monitoring: Keep a close eye on your hedge, especially during the wet and warm months, which are conducive to the spread of the blight.
Impact Beyond the Cotoneaster:
- Spread to Other Plants: Fire Blight can affect a range of plants beyond the Cotoneaster. It's essential to manage any outbreak promptly to protect the broader garden environment.
In summary, while Cotoneaster Hedge Blight can be a concerning issue, with informed identification and proactive management, it’s possible to control and even prevent its spread. By combining these best practices with general hedge care as outlined throughout our guide, you can ensure your Cotoneaster remains both vibrant and healthy.
Choosing the Right Type of Cotoneaster for Your Hedge
The genus Cotoneaster encompasses a wide range of species, each with its own distinct characteristics, growth habits, and aesthetic appeal. When planning a hedge, it's crucial to select the type best suited to your specific needs and garden conditions. Let's delve into the factors to consider and some popular Cotoneaster types to help you make an informed decision:
Factors to Consider:
- Growth Rate & Size: Determine how fast you want your hedge to establish and the desired mature height. Some Cotoneasters are dwarfish, while others can grow to a substantial size.
- Maintenance: While Cotoneasters are generally low-maintenance, some types might require more pruning or care than others.
- Climate and Soil: Ensure the variety you choose is suitable for your region's climate and soil conditions.
- Disease Resistance: As discussed in our sections on Common Cotoneaster Hedge Diseases and Cotoneaster Hedge Blight, it's wise to opt for varieties known for disease resistance.
- Aesthetic Preferences: Consider factors like leaf color, berry production, and flowering habits.
Popular Cotoneaster Varieties for Hedging:
- Cotoneaster franchetii (Franchet's Cotoneaster):
- Description: Semi-evergreen with arching branches, it produces orange-red berries in the fall and small pinkish-white flowers in the spring.
- Height: Can grow up to 10 feet, but often pruned shorter for hedging.
- Suitable For: Drier soils and areas with partial to full sun.
- Cotoneaster horizontalis (Rockspray Cotoneaster):
- Description: Known for its herringbone pattern of branches and bright red fall berries.
- Height: Usually up to 3 feet.
- Suitable For: Decorative walls and banks, as well as ground cover.
- Cotoneaster lacteus (Late Cotoneaster):
- Description: Evergreen variety with dark green glossy leaves. Produces clusters of white flowers and an abundance of red berries in the winter.
- Height: Can grow up to 10-15 feet.
- Suitable For: Large hedges and privacy screens.
- Cotoneaster dammeri (Bearberry Cotoneaster):
- Description: A ground-covering species with glossy green leaves that turn reddish in the fall. It offers white flowers in spring followed by red berries.
- Height: Around 1 foot.
- Suitable For: Slopes, banks, and areas where low ground cover is needed.
- Cotoneaster franchetii (Franchet's Cotoneaster):
Planting Tips:
- Spacing: To ensure a dense hedge, proper spacing is essential. Refer to our section on Understanding Proper Cotoneaster Hedge Plant Spacing for guidance.
- Soil Preparation: While Cotoneasters are adaptable, they prefer well-drained soil. Adding organic matter or compost can enhance soil quality.
- Watering: Regular watering is vital during the initial stages after planting, but once established, Cotoneasters are relatively drought-resistant.
In conclusion, choosing the right type of Cotoneaster for your hedge involves understanding your garden's specific needs and the unique characteristics of each Cotoneaster species. With the correct choice, you can ensure a robust, aesthetically pleasing, and low-maintenance hedge that enhances your outdoor space for years to come.
Pruning and Shaping Your Cotoneaster Hedge
Pruning is an essential practice to ensure the health, vitality, and aesthetic appeal of your Cotoneaster hedge. While Cotoneasters are relatively low-maintenance compared to other hedging plants, appropriate pruning techniques can enhance their growth and shape. In this section, we'll explore the best practices for pruning and shaping your Cotoneaster hedge.
Benefits of Pruning:
- Health: Removing dead or diseased branches helps prevent the spread of diseases, as discussed in the sections on Common Cotoneaster Hedge Diseases and Cotoneaster Hedge Blight.
- Growth: Regular pruning encourages more dense and bushy growth, resulting in a thicker hedge.
- Shape: Pruning allows you to control and maintain the desired shape and height of your hedge.
Best Time to Prune:
- General Pruning: Late winter or early spring, just before the new growth begins, is an ideal time. This ensures that the plant recovers rapidly and blooms aren't sacrificed.
- Shaping and Trimming: For maintaining shape or size, light trimming can be done in late spring or early summer after flowering.
Pruning Techniques:
- Thinning: This involves removing some of the older, larger branches at the base. Thinning allows sunlight and air to penetrate the hedge, promoting healthier growth.
- Topping: If your hedge has grown too tall, you can cut back the top to your desired height. However, avoid heavy topping as it may lead to sparse growth at the base.
- Shearing: For a more formal look, shearing can be used to create straight lines and sharp angles. Ensure your tools are sharp to prevent tearing the branches.
Shaping Tips:
- Natural Form: Cotoneasters have a naturally arching form. Instead of fighting this natural tendency, it's often best to embrace it, allowing for a slightly rounded or cascading top.
- Base Width: Ensure the base of the hedge remains wider than the top. This trapezoidal shape ensures sunlight reaches the lower branches, preventing them from becoming bare.
- Guide Strings: If you're aiming for a particularly straight edge, you can use strings as guides to achieve even lines.
Tools You'll Need:
- Hand Pruners: Ideal for precise cuts and thinning out branches.
- Hedge Shears: For shearing and shaping the hedge.
- Loppers: Useful for cutting thicker branches that hand pruners can't handle.
- Saw: For mature, woody stems or when rejuvenating an old hedge.
Safety and Aftercare:
- Safety First: Wear protective gloves, safety glasses, and appropriate clothing. Ensure the ground around the hedge is clear of obstacles.
- Disposal: Dispose of the cuttings appropriately, especially if they show any signs of disease.
- Aftercare: After a significant prune, provide the hedge with a balanced, slow-release fertilizer and ensure it gets adequate water.
In conclusion, while Cotoneasters are adaptable and can thrive with minimal intervention, a bit of informed pruning can make a significant difference in their health and appearance. With the right techniques and timing, your Cotoneaster hedge will serve as a robust and attractive boundary for many years.
Watering and Fertilization: Essential Care Tips
Maintaining a healthy Cotoneaster hedge involves more than just pruning and shaping. Two of the most fundamental care practices are watering and fertilization. By ensuring your hedge receives the right amount of water and nutrients, you can promote vigorous growth, abundant berry production, and resilience against diseases such as those mentioned in the Common Cotoneaster Hedge Diseases and Cotoneaster Hedge Blight sections. Let's delve into the best practices for these two critical care aspects.
Watering Your Cotoneaster Hedge:
Establishment Phase: Newly planted Cotoneaster hedges require consistent moisture until they establish their root systems. Water deeply once or twice a week, depending on your region's climate and soil conditions.
Mature Plants: Once established, Cotoneasters are relatively drought-tolerant. However, during prolonged dry spells, it's advisable to water them deeply every two weeks.
Watering Technique: When watering, focus on the base of the plants to ensure water reaches the roots. Soaker hoses or drip irrigation systems are ideal for this, as they minimize water wastage and prevent foliage from getting wet, reducing the risk of diseases.
Mulching: Applying a 2-3 inch layer of mulch around the base of your hedge can help retain soil moisture and regulate temperature. It also reduces weed competition which can sap essential nutrients and water from your hedge.
Fertilizing Your Cotoneaster Hedge:
When to Fertilize: Early spring, just before new growth begins, is the ideal time to fertilize your Cotoneaster hedge. If desired, a second application can be made in early summer to boost growth.
Choosing a Fertilizer: A balanced, slow-release granular fertilizer with an equal ratio of nitrogen, phosphorus, and potassium (like a 10-10-10) is generally recommended for Cotoneasters. This ensures balanced growth, root development, and berry production.
Application Method: Follow the manufacturer's instructions on the fertilizer package. Typically, you'll scatter the granules at the base of the hedge and water them in. Ensure the fertilizer doesn't come in direct contact with the hedge's stems to prevent burning.
Organic Options: If you prefer organic methods, compost or well-decomposed manure can provide nutrients while also improving soil structure. Spread a 1-2 inch layer around the base of the hedge in spring.
Monitoring Soil Health:
pH Level: Cotoneasters are adaptable and can grow in a wide range of soil pH levels. However, a pH of 6.0 to 7.5 is considered optimal. If uncertain about your soil pH, consider conducting a soil test.
Drainage: Ensure your soil drains well. If the ground remains soggy for prolonged periods, consider improving drainage or elevating the planting area. Prolonged waterlogging can lead to root rot and other complications.
Nutrient Balance: Periodic soil tests can help determine nutrient levels. If certain essential nutrients are deficient, consider supplementing with specific fertilizers or soil amendments.
In conclusion, while Cotoneaster hedges are relatively low-maintenance, proper watering and fertilization practices can significantly influence their health, growth, and aesthetic appeal. By understanding and implementing these essential care tips, you can ensure a thriving and vibrant Cotoneaster hedge throughout the seasons.
Managing Pests: Common Threats to Cotoneaster Hedges
While Cotoneaster hedges are known for their resilience and adaptability, they are not immune to pest infestations. Just like their vulnerability to certain diseases, as discussed in the section on Common Cotoneaster Hedge Diseases, these shrubs can become a target for specific pests. Recognizing these threats early and taking appropriate measures can save you from potential hedge damage. Let's delve into some of the most common pests and effective management strategies.
Aphids:
- Identification: These are small, soft-bodied insects that may be green, yellow, brown, or black. They often congregate on the underside of leaves.
- Damage: Aphids suck plant sap, which can lead to yellowed, curled, or stunted leaves. They also excrete a sticky substance called honeydew which can lead to the growth of sooty mold.
- Management: Introduce beneficial insects like ladybugs and lacewings, which are natural predators of aphids. Insecticidal soaps or neem oil can also be effective if applied early.
Webbing Caterpillar:
- Identification: These caterpillars create a silky web or tent-like structure over the hedge, within which they reside and feed.
- Damage: They chew on the leaves, leading to defoliation and reduced growth.
- Management: Physically removing the webs and caterpillars in the early stages can be effective. Insecticides can also be applied, but it's essential to ensure they penetrate the webs.
Scale Insects:
- Identification: These appear as small, flat, and immobile bumps on stems and leaves. They can be of various colors, often resembling small scabs.
- Damage: Scales suck plant sap, leading to yellowing or dropping leaves. Like aphids, they also produce honeydew.
- Management: Horticultural oils can suffocate and control scales. Beneficial insects, such as ladybugs and parasitic wasps, can also help keep scale populations in check.
Leaf Miners:
- Identification: The larvae of certain moths or flies that tunnel between the upper and lower surfaces of leaves, creating winding, white trails.
- Damage: They feed within the leaf tissue, affecting the plant's photosynthesis capacity and overall aesthetics.
- Management: Remove and destroy affected leaves. Insecticides can be used, but they often have limited efficacy since the larvae are protected inside the leaf.
Preventative Measures:
- Healthy Plants: Healthy plants are less susceptible to pest attacks. Ensure proper watering, fertilization, and other care practices as outlined in the earlier sections.
- Regular Inspection: Periodically inspect your hedge for signs of pests or abnormalities. Early detection often means easier management.
- Natural Predators: Encouraging the presence of beneficial insects can serve as a natural pest control method.
- Cultural Practices: Clean up fallen leaves or debris around the hedge to reduce potential hiding and breeding spots for pests.
In conclusion, while pests can be a concern for Cotoneaster hedges, a combination of vigilance, early intervention, and natural solutions can effectively keep them at bay. A well-maintained hedge, with proper care as detailed in earlier sections, will not only look great but also be more resilient against these common threats.
The Role of Soil in Cotoneaster Health
The vitality of any plant, including the Cotoneaster hedge, is deeply rooted in the quality and condition of the soil in which it grows. Just as proper watering and fertilization contribute to the hedge's health, the right soil can make a significant difference in its growth, resistance to diseases, and overall longevity. Let's delve into the importance of soil and how to optimize it for your Cotoneaster hedge.
Soil Types Suitable for Cotoneasters:
Loamy Soil: This is an ideal soil type for most Cotoneasters. It has a balanced mix of sand, silt, and clay, offering good drainage, moisture retention, and nutrient availability.
Sandy Soil: While Cotoneasters can tolerate sandy soils, they drain quickly, which means they might require more frequent watering during dry periods.
Clayey Soil: This type of soil tends to retain water, which can be both a boon during dry spells and a bane when it causes waterlogging. Improving drainage is key if planting in clayey soil.
pH Level and Its Importance:
Neutral to Alkaline: Cotoneasters prefer soil with a pH level ranging from 6.0 to 7.5, though they're tolerant and can adjust to slightly alkaline conditions.
Soil Testing: If unsure about your soil's pH, it's advisable to conduct a soil test. This not only gives insights about the pH but also about nutrient levels and composition.
Adjusting pH: If the pH isn't within the desired range, lime can be added to raise it, while sulfur or organic matter like pine needles can be used to lower it.
Improving Soil Structure and Fertility:
Organic Matter: Incorporating compost, well-decomposed manure, or leaf mold can greatly enhance soil structure, water retention, and nutrient content.
Mulching: As mentioned in the section on Watering and Fertilization, mulching not only conserves moisture but also breaks down over time, adding nutrients back into the soil.
Rotating Plants: If you're planting Cotoneasters in a previously used plot, ensure the previous plants weren't heavily feeding types. This ensures that essential nutrients aren’t depleted.
Drainage: A Critical Factor:
Good Drainage: As alluded to earlier, Cotoneasters thrive in well-draining soil. This prevents root rot and other complications that arise from prolonged waterlogging.
Improving Drainage: If the natural drainage isn't adequate, consider adding organic matter or sand to the soil. In extreme cases, raised beds or berms can be used.
The Role of Beneficial Microbes:
Microbial Health: Beneficial fungi and bacteria in the soil play a crucial role in breaking down organic matter into nutrients that the hedge can absorb.
Encouraging Microbial Activity: Regularly adding organic matter and minimizing the use of synthetic chemicals can help maintain a thriving microbial community.
In conclusion, soil plays a pivotal role in determining the health and growth of Cotoneaster hedges. By understanding its characteristics and ensuring it meets the needs of the hedge, gardeners can set a solid foundation for a lush and resilient Cotoneaster display.
Conclusion
The journey of cultivating a thriving Cotoneaster hedge, as outlined throughout this guide, is an enlightening experience in the world of gardening. From understanding the fundamental benefits that these hedges bring to a landscape, to mastering the nuances of pruning, watering, and fertilization, the process is both an art and a science.
Selecting the right type of Cotoneaster ensures that you're starting with a variety that suits your climatic conditions and aesthetic preferences. The importance of the soil's role cannot be understated, as it forms the very foundation upon which the hedge grows and flourishes.
While Cotoneasters are resilient and hardy, they are not without challenges. Gardeners must remain vigilant against potential diseases, blights, and pest threats. But armed with the knowledge from this guide, one can navigate these challenges with confidence.
The appeal of the Cotoneaster hedge extends beyond its aesthetic allure. Its versatility, low maintenance requirements, and the year-round interest it provides, from spring blossoms to winter berries, make it a favorite among both novice and seasoned gardeners.
In closing, cultivating a Cotoneaster hedge is a rewarding endeavor. With patience, care, and the guidance from this comprehensive guide, you're well-equipped to enjoy the multifaceted beauty and benefits of this remarkable plant for years to come.